Coloring Line Art
__________________


HOME ABOUT PREVIEWS SUBMISSIONS LINKS TUTORIALS GALLERY MERCHANDISE


Now all of your black should be selected and should look something like this.


Now go to edit and choose cut, you should have a blank white background. Now in Photoshop 5 on if you go to edit and choose paste it will paste in a new layer. Other than that go to layer and click new for a new layer and paste. You should now have a background layer and a layer with your line art in it.


Your line art layer is a transparent layer, which means that you can see the other layers under it. The white background you see behind the art is from the background layer. If you turn off the background layer (by clicking the eye next to it) you see a checkered pattern behind your line art. Okay now lets make another layer. Make sure your background layer is active (blue). Follow the pic.


A box will appear that will give you a chance to name this layer. I named mine color you can name yours whatever you want, then click ok. Since you activated your background layer, your new appears between your line art and the background.


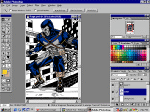
Okay, now we're ready to color. It gets a little tricky here, you have to pay close attention to what you're doing. We're going to select areas to color. Right now we're just doing flat colors. If you use the magic wand to make your selections, you will have to activate your line art layer select the area you want to color then activate the color layer and color. If you use the lasso tool (the one that looks like a rope)to make your selections you can just keep the color layer activated. Here is Rage with his flat colors and the line art on top. The second pic is the color layer with the line art turned off


next page *** Previous page